Introduction
In this module, you'll read about Dynamic Memory Allocation for Python.
In class, you'll work in small groups to review each others' new web pages.
Then, you'll learn how to optimize images for the web so that you can add them to a new web page which links to your Elements web page.
Read about Dynamic Memory Allocation
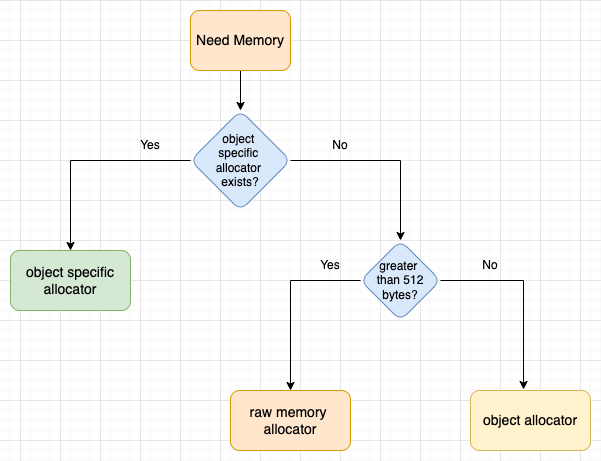
Memory management is the process of efficiently managing computer memory (RAM). It involves allocating a piece of memory at run-time to the program when the program requests it and freeing the allocated memory for re-use when the program no longer needs it.Rupesh Mishra, HoneyBadger, 2022
Understand the basics of memory allocation in Python by reading Memory Mangement in Python.
Concepts to understand and add to the Python Concept Sheet. (Hover over the concepts to see their definitions.)
- Random Access Memory (RAM)
- Automatic allocation and deallocation of memory.
- CPython malloc and free functions
- Internal buffer
- Object Allocator
- Blocks
- Pools
- Arenas
- Garbage Collection
Additional Resources
Here are great resources to refer to when a future project requires utilizes large datasets:
- Python Documentation Memory Management.
- v3.10.8 and 3.11+, 2022
- Python Memory Management
- JavatPoint, 2022
- Pandas Memory Management
- Geeks for Geeks, 2021
- Advanced Pandas: Optimize speed and memory.
- Medium, 2019
Optimizing images for the web

To show your new Python skills to future employers in a web page, learn to optimize your existing (or updated) assignment screenshots and add them to your web page.
Optimization Requirements
So that image files load quickly, it is important to optimize them. Optimized images meet these specifications:
- Descriptive file name
- To improve search results, file names should include who, what, when, where as much as possible.
- Small file size
- Keep file size as small as possible for the fastest load time. Serve high resolution images only to high resolution devices.
- Exact dimensions
- Crop and reduce the size of images to fit the dimensions of the space in your web page. This might mean several sizes are needed.
- Correct file format
- Online photos are usually .JPG.
Flat-color, line-art images like logos and clipart are usually .GIF and sometimes 8-bit .PNG.
Graphics with true transparency need 24-bit .PNG. - Reduced resolution
- Monitors render between 72 or 300+ pixels per inch (ppi); the older default is 72ppi. Much higher resolutions are available now, so providing multiple image sizes for each is a standard.
- Color Mode
- RGB for .PNG, .JPG, .SVG, and .WebP, and Indexed for .GIF.
Production Process
The process of resizing and/or cropping to the exact dimensions, and exporting to the right file format can be done with many apps.
You can use these apps if you have them on your hard drive and understand how to use them:
- Windows Paint
- Windows Photos
- Mac Preview
- Photoshop
- Pixelstyle
- Gimp
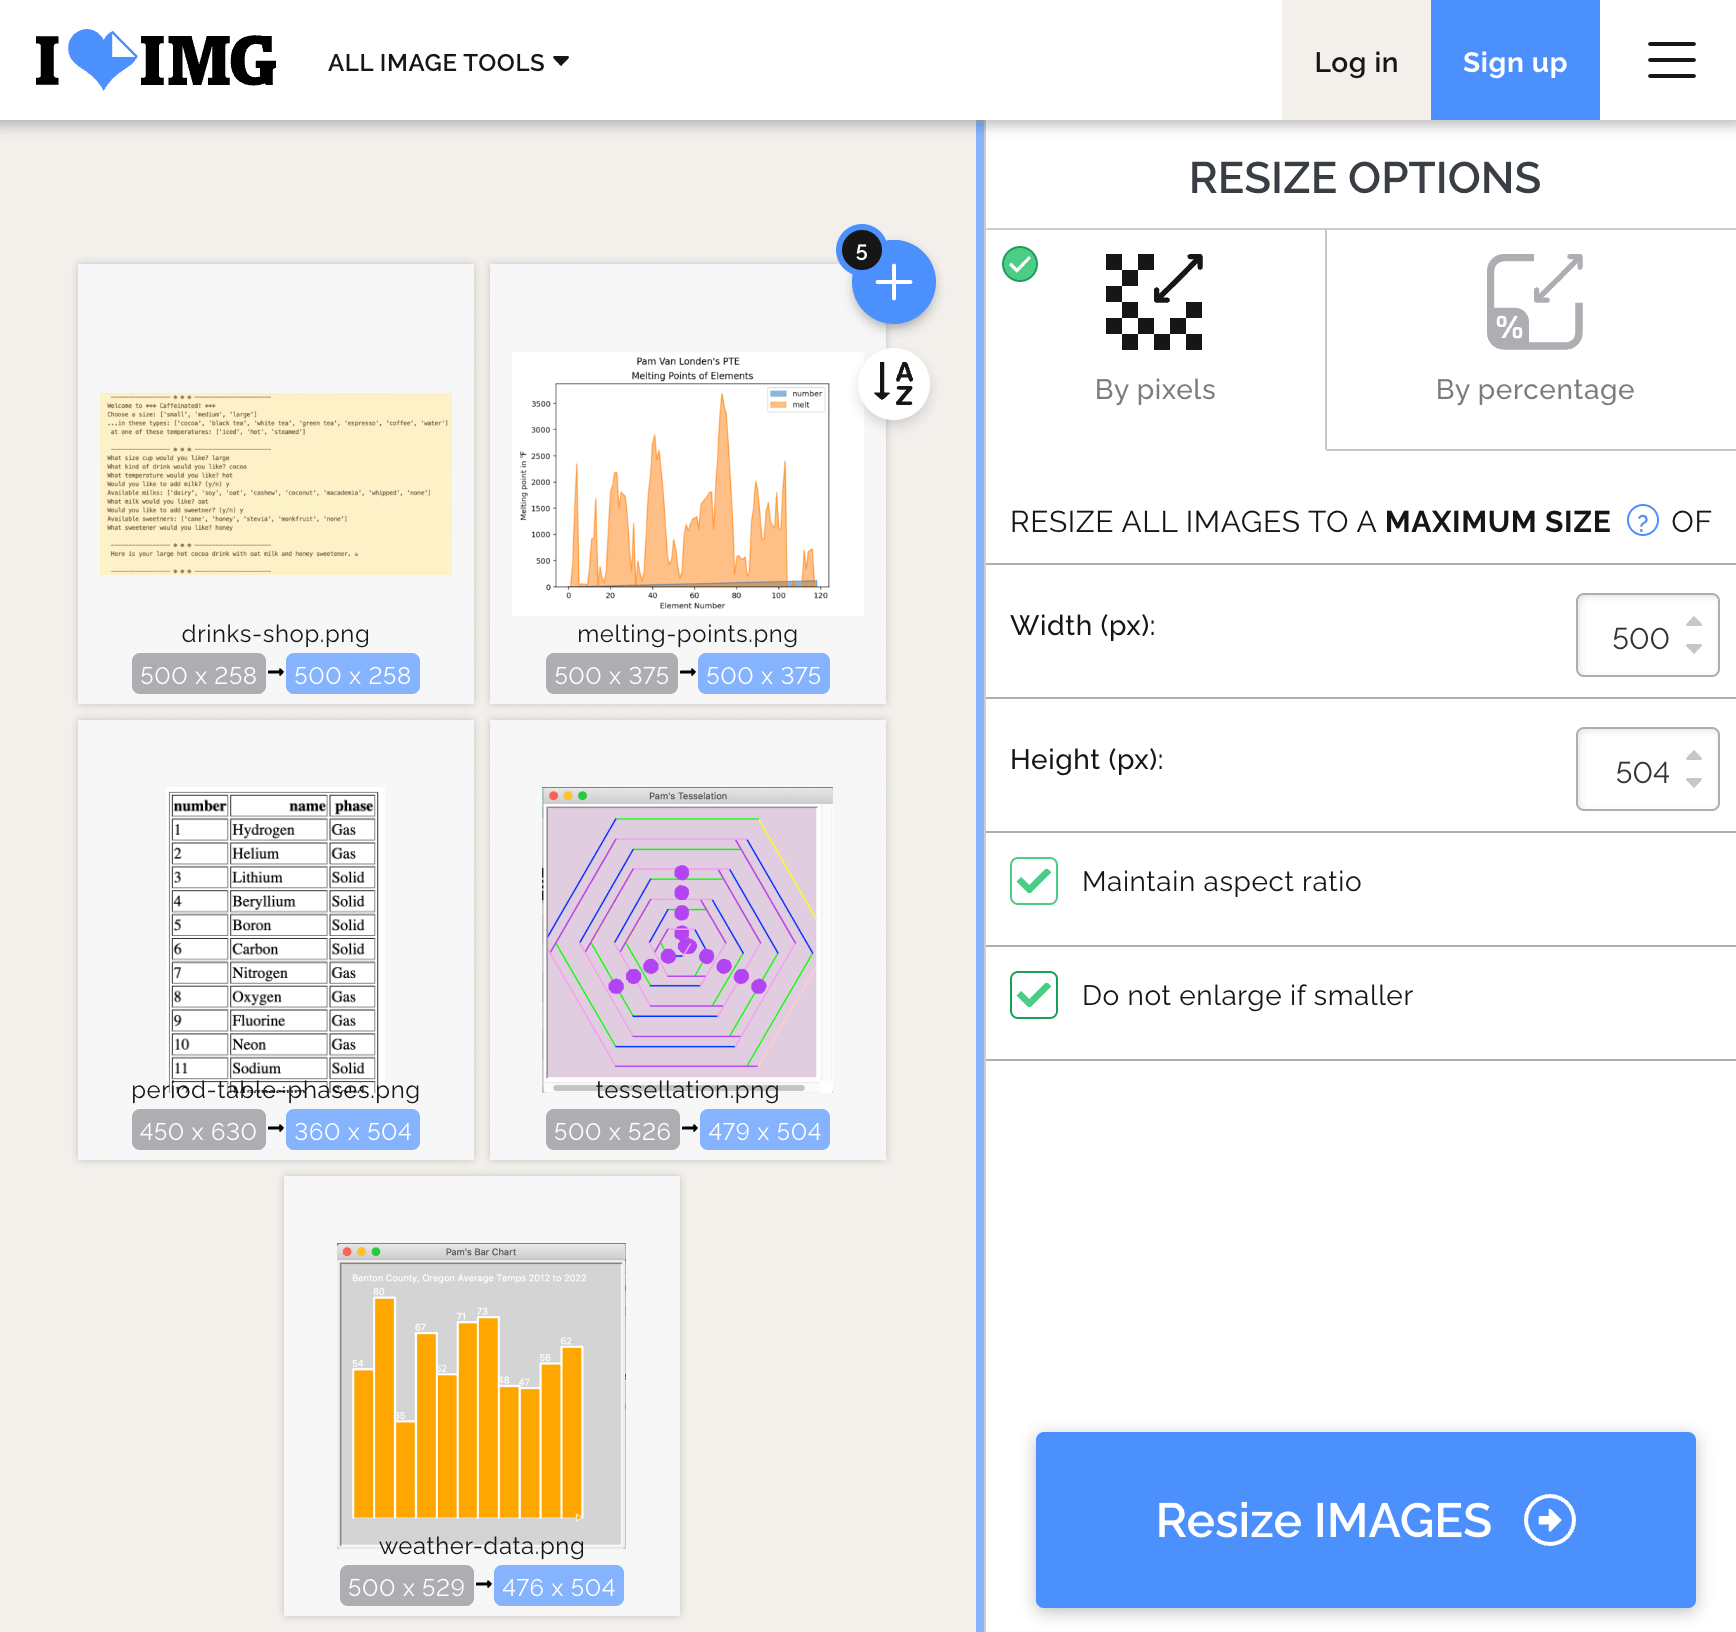
Otherwise, use I💙IMG to resize, then compress them. They should be small enough to view the details but not so large they load slowly.
- Choose the .PNG files you need from the Upload button or via drag and drop.
- Rename the files in the list of thumbnails, something like this:
- tessellation.png
- drinks-shop.png
- weather-data.png
- elements.png
- melting-points.png
- Choose the gear icon to adjust the width of each to 600px. Click the maintain aspect ratio and Do not enlarge buttons.
- When ready, click the button, then the resulting .zip archive.
- Unzip the resulting .zip archive of PNG files.
- Drag those new files to the I💙IMG Compress Image tool to reduce the file sizes. The files will be rougly 75% smaller, which means your images will render quickly.
- When ready, click the button, then the resulting .zip archive.
- Unzip the resulting .zip archive of PNG files.
Example File Formats
These files are optimized at 150px wide in RGB color mode at 72ppi (pixels per inch).


Finish Program 8
These instructions cover the second part of the assignment. Refer to Module 9 for the starting instructions.
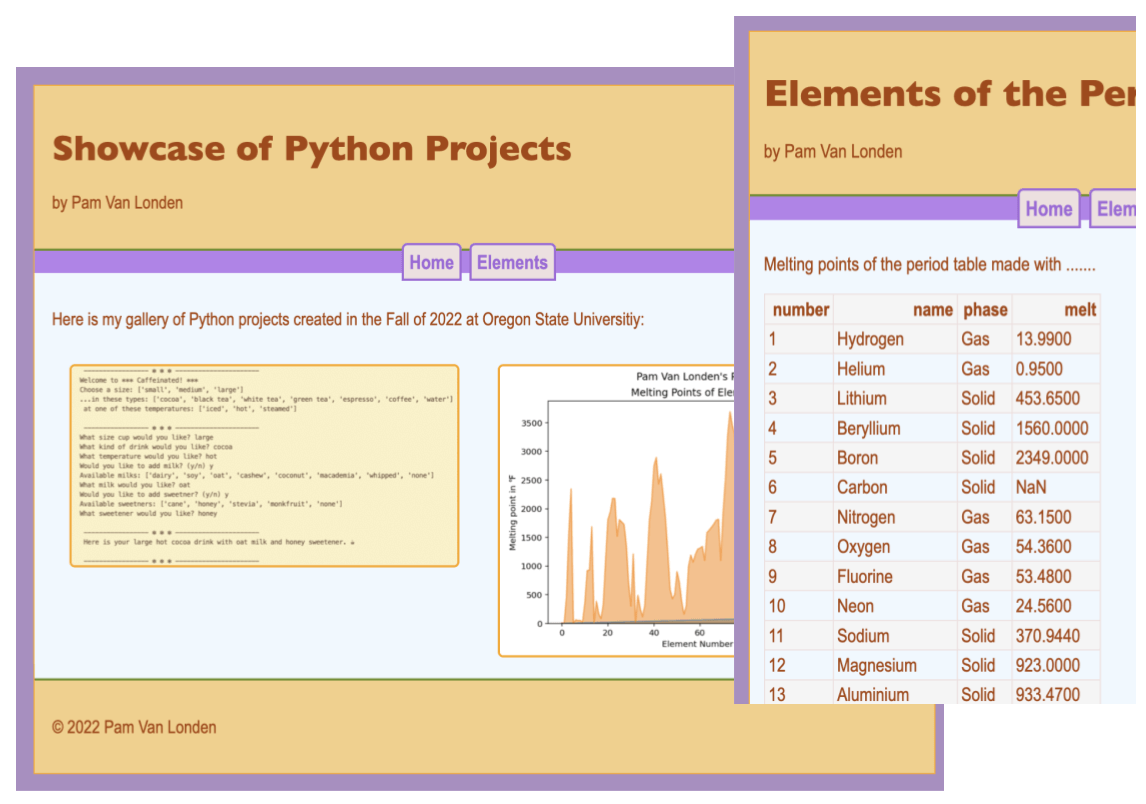
Add optimized screenshots and navigation to a new web page.
- Did you backup your work to a cloud drive and/or USB stick drive? Do it again. :-)
- Create optimized screenshots for each of your programs 3, 4, 5, 6, and 8
by using the Images for the Web tab Production information.
- In your program folder, add a new folder called images.
- Include at least 5 screenshots related to these projects:
- (M3, P2) Time and tasks output.
- (M4, P3) Tessellation turtle drawing.
- (M5, P4) Drinks shop order output.
- (M6, P5) Benton temperature turtle chart.
- (M7, P6) Walla Walla matplotlib temperature chart.
- (M7, P7ic) Extra dictionary.
- (M9, P8) Melting points matplotlib chart. ← Required.
- Copy the five resized and compressed .PNG files and paste them into this new images folder.
- Create a new file in the program folder,
named index.html.
This is the default home page file name for most web servers.
- Copy the necessary HTML tags from the elements2.html page, up to the beginning of the <table> and paste them at the top of the new index.html page.
- Copy/paste the <footer> with copyright statement, and ending </body> and </html> tags.
- Update the text:
- <title> tag to briefly describe the page, such as "Welcome to ..." or "Showcase of..."
- Update the <h1> to title the page.
- Update the <p> paragraph to explain the page.
- View your new page in the browser to confirm that it renders as intended. If not, check that each tag has a beginning and end, and that everything is spelled correctly.
- Add images:
- Add five <img /> tags, each with the folder name images/
and source name (which is the filename),
along with an alternative description, like this:
<img
    src="images/tessellations.png"
    alt="Tessellation made with Python running the Turtle module."
/>
Notice that the tag is "self-closing." - View the web page again to see how the images rendered. If some of them did not render, then double-check the spellings of each filename and that it is sourced using the correct folder name.
- Add five <img /> tags, each with the folder name images/
and source name (which is the filename),
along with an alternative description, like this:
- Add hyperlinks to each HTML page:
- In the index.html page, just under the <header> tag,
add a <nav> tag.
Between the beginning end ending <nav> tag,
add an <a> anchor tag for each of the pages, like this:
<nav> <a href="index.html">Home</a> <a href="elements2.html">Elements</a> </nav> - Copy that <nav> block of code to the elements2.html page, just under the ending </header> tag.
- Refresh the page in the browser and click on those hyperlinks to see how they move from one page to the other.
- In the index.html page, just under the <header> tag,
add a <nav> tag.
Between the beginning end ending <nav> tag,
add an <a> anchor tag for each of the pages, like this:
- Update the stylesheet.
Many properties can be added to image elements, including width, height, border, margin, padding, box-shadow, transform, transition, clip-path, etc.
This stylesheet selector for images adds a border to each image.
- Add the selector to your existing main.css file, under the last selector; at the bottom:
img {
    border:2px solid orange;
    border-radius: 5px;

}
Change the width and color of the border. - To improve the page layout, give the images a width, some margin, and top alignment
by adding these properties and values to the existing img {} selector:
width:45%; margin:2%; vertical-align:top; - Add navigation style:
- Copy the nav {} style selectors from Module 9 > CSS tab > Page Layout section.
- Paste it at the bottom of the main.css file.
- Update the colors
- View your new index.html page in the browser to see the new text, colors, and images.
- Correct typos and syntax errors in the code to improve the output.
- Pat yourself on the back! You've made a website!
- Add the selector to your existing main.css file, under the last selector; at the bottom:
Submit Program 8
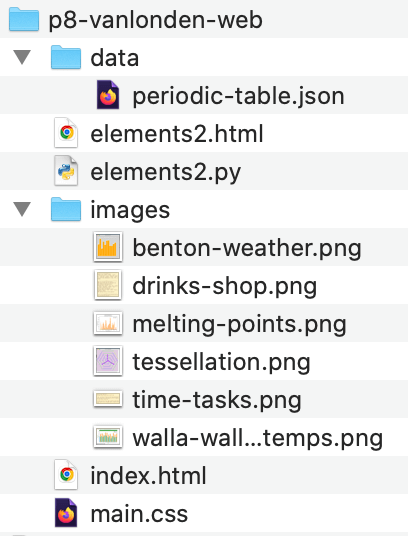
Zip together the program folder that holds the following folders and files:
- data/period-table.json
- elements2.html
- elements2.py
- images/ folder with 5 PNG files.
- index.html
- main.css
- Mac
Select the file(s) and right-click to choose Compress files. - Windows
Select the file(s) and right-click to choose Send to... → Compress (Zipped) archive. - Chromebook
Select the file(s) and right-click to choose Zip selection.
Upload the .zip file to the Module > Assignment in Canvas. To score the work, the Instructor/TA will download the zip archive and run your .py file as well as view your website in the browser.
Extra Credit: If you got your ENGR web server connected, then transfer the entire program folder to it. View the home page in the browser and click on the hyperlinks to see how they work. Copy the URL to your website's home page; it will look like this, but with your username: https://web.engr.oregonstate.edu/~vanlondp/p8-vanlonden-web/. Paste that URL into the Module 10 > Program 8 Upload link in Canvas.