Introduction
In this module you'll explore more about how to use functions, functions that return values, unit testing, global and local variables, the Accumulator Pattern, functions that call other functions, the flow of execution, the main function, composition, and how to draw a bar chart.
In class, you'll update your Python Concept Reference Sheet, draw colored shapes using math, and update the VS Code settings.
You'll also learn how to access external data sources.
Then, you'll create your own bar chart using an existing external data file.
In-class Activities
Update your Python Concept Reference Sheet
In your existing small group, collaborate in your existing Google Sheets or Excel file to describe the new Functions presented in chapter 6 and File actions as presented in Chapter 11. Continue to add to the list as you progress through the chapters.
Draw Colored Shapes using Functions within Functions
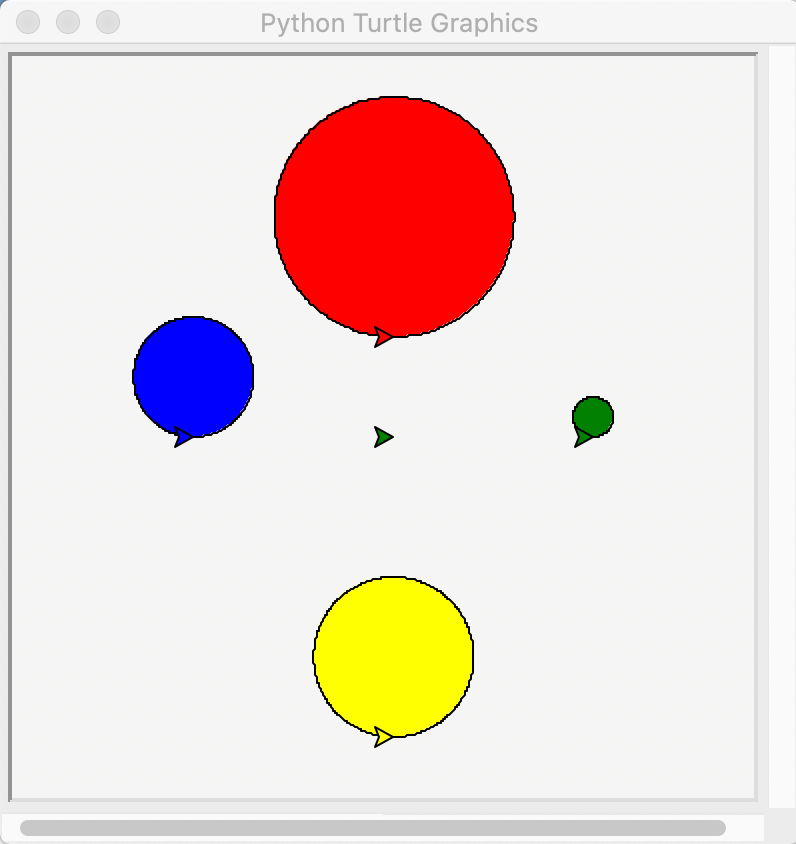
Work together in small groups to create 4 circles (using pi) drawn by four different turtles, each starting in a different position on canvas, and each having different radii, fillcolor, pencolor, and speeds, using functions within functions. Use these specifications and limitations:
Refer to Lessons from a Triangle for related functions.
- Define a polygon function.
- Define a circle function (not the built-in circle) using pi and radius
- Base the circle function on the polygon function.
- Define a main() function for the window, turtles, and drawing.
- Size the canvas to 400 by 400 and position it at position 0, 0.
- Define 4 turtles, each with their own starting position, pensize, and speed.
- When calling the drawing function, pass-in the turtle name, color, and size.
- The turtles can draw one at a time or simultaneously.
- Click to close the window.
- Circles must remain within the 400 by 400 canvas.
Vocabulary
- Angle
- The shape formed by two rays or lines eminating from a common point.
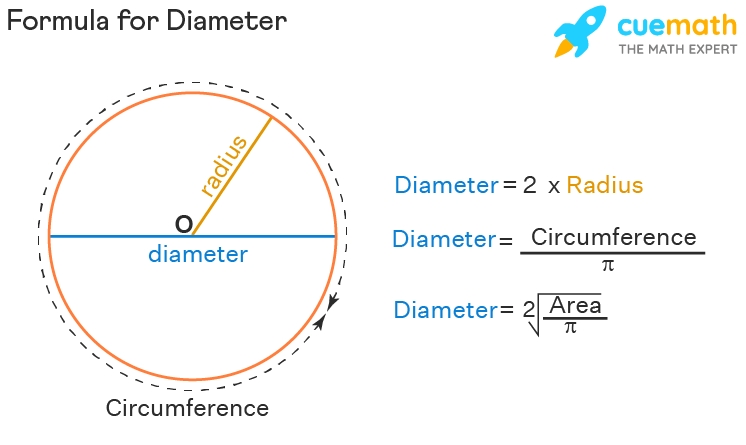
- Radius
- A line segment from the center of a circle to its perimeter boundary.
- Diameter
- The distance between one side of a circle to its other side, passing through its center.
- Circumference
- The length of the permimeter of a circle.
- π pi
- A mathematical constant that is the ratio of a circle's circumference to its diameter.
Update VS Code Settings
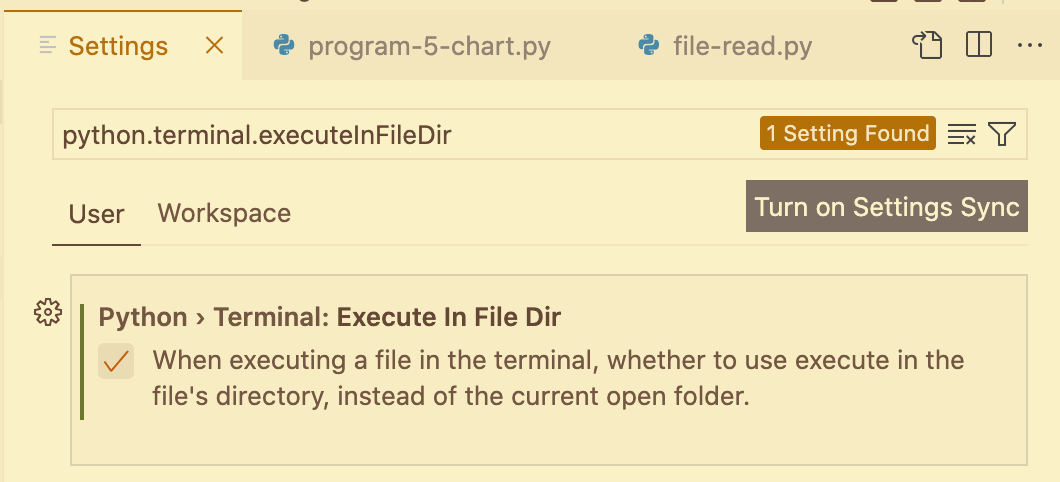
So that we can run external data files within Visual Studio Code using Python, update the app Settings:
- In VS Code, go to the File (Windows) or Code menu to choose Preferences → Settings.
- In the Search bar at the top, type execute In File Dir
- Click the box next to the setting to activate it.
Write Program 5
Update VS Code Settings
So that we can run external data files within Visual Studio Code using Python, update the app Settings:
- In VS Code, go to the File (Windows) or Code (Mac) menu to choose Preferences → Settings.
- In the Search bar at the top, type execute In File Dir.
- Click the box next to the setting to activate it.
Limitations
- Do not copy any of the following from Ch 6.11 or from the in-class demo:
- variable names.
- def names (but do use main(); it is an expected function name).
- values for padding, pensize, pen or fill colors, font-family, font-weight, font-style, title positions, or widths.
- The title and chart must stay within the bounds of the 400x400 canvas.
- Colors must be easy on the eyes as well as easy to read...not too big, too small, or too bright.
Write the program

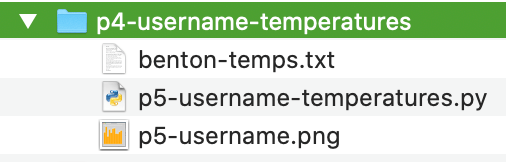
- In the sixth module folder of your workspace folder, make a new Folder named p5-username-temperatures. In that folder, make a new file named p5-username-temperatures.py. Replace 'username' with your ONID username.
- In the file, write commands in Python to do the following:
- Comment your first and last name and the date.
- Comment the name of this assignment "Temperatures".
- Comment a paragraph that describes the data, functions, and output of the program.
- Include the following:
- Pseudocode and docstring comments that describe each step of the program and its parameters.
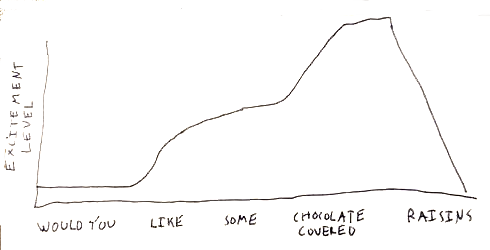
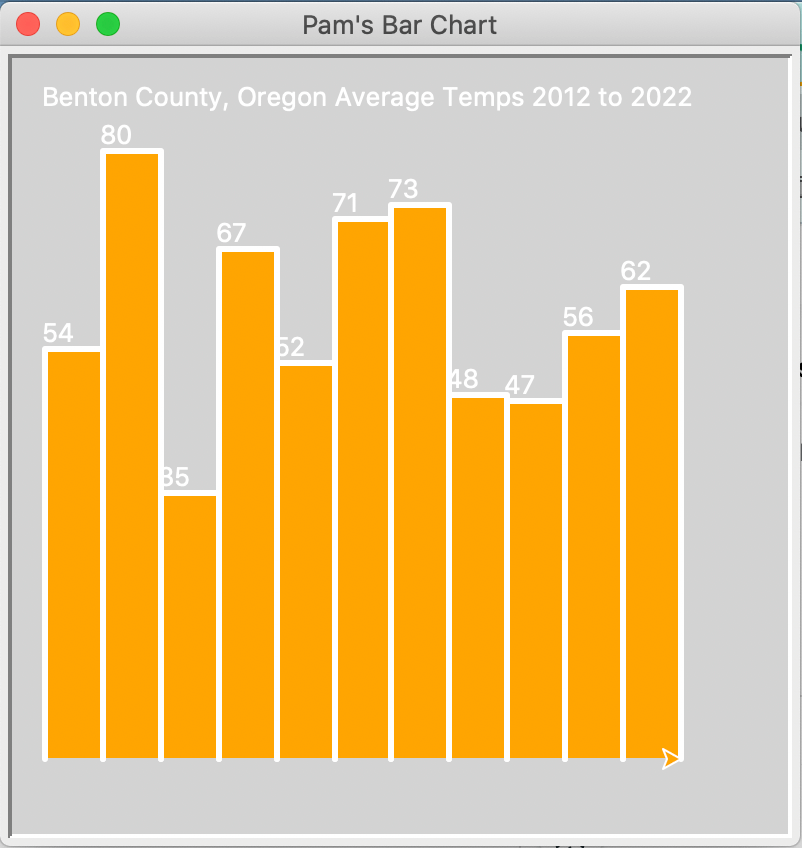
- A function for writing the title of the chart in a large, bold font of a legible color: Benton County, Oregon Average Temps 2012 to 2022. Include hide, pen up and down, position, color, text, and font features.
- A function that draws a filled rectangle at the correct height in integers based on the temperature, and prints the temperature at the top of the bar. Include fill, directions, conversion to int() and str(), and a readable font.
- A main() function that does the following:
- Data File:
Opens, reads, splits, and prints the benton-temps.txt file,
which is a list of average temperatures
from Benton County, Oregon between 2012 and 2021, from the
Northwest Alliance for Computational Science & Engineering.
Right-click to Save as... the .txt file to your workspace folder.- You'll need to use this with... statement of open, read, split, and print of the data file:
with open('benton-temps.txt', 'r') as data:
    lines = data.read();
    temperatures = lines.split()
- You'll need to use this with... statement of open, read, split, and print of the data file:
- Gets and prints the max() and len() of the data file.
- Set a Turtle canvas at the top left corner of the screen in subtle color with a padding of 10 to give the bars some breathing room.
- Displays your first and last name in the canvas Title bar.
- Defines a constant variable for padding, to keep the chart from touching the edges of the canvas.
- Uses setwordcoordinates() to start the bar chart drawing at the bottom left corner and accounts for the padding when drawing height and bars.
- Defines a turtle that has a pen color, pensize, and fill color.
- Calls the title function.
- Calls the drawing function.
- Allow the window to close by clicking.
- Closes the data file.
- Data File:
Opens, reads, splits, and prints the benton-temps.txt file,
which is a list of average temperatures
from Benton County, Oregon between 2012 and 2021, from the
Northwest Alliance for Computational Science & Engineering.
- Calls the main function.
- Click the run arrow ▶ at the top right of the editing screen.
- In the terminal, type: python p1-username-datatypes.py
- Right-click on the file in the file list (or from in the file) and choose Run Python file in terminal.
- Windows:
 Start → All Programs → Accessories → Snipping Tool
New → Rectangular Snip to select just the portion of the window and screen you need to show.
Or, newer Windows computer systems may use the Snip and Sketch tool's WindowsShifts keystroke.
Save the file as .png and move it to your module folder.
Start → All Programs → Accessories → Snipping Tool
New → Rectangular Snip to select just the portion of the window and screen you need to show.
Or, newer Windows computer systems may use the Snip and Sketch tool's WindowsShifts keystroke.
Save the file as .png and move it to your module folder.
- MacOS:
⌘Shift4 to draw a marquee around just the canvas/window of your app. Or use the Preview application to capture, edit, and save the file. Applications → Preview → File → Take Screenshot → From Selection.
Drag the crosshair cursor over the area you want to capture.
The image saves in .png format.
Edit as needed.
Applications → Preview → File → Take Screenshot → From Selection.
Drag the crosshair cursor over the area you want to capture.
The image saves in .png format.
Edit as needed.
Or, you can use the searchsearch bar on the top right of the Finder to search "screenshot." The screenshot crosshair cursor will pop up automatically. Select the area you want to capture and it will save a file to the Desktop. Move the resulting .png file to your module folder. - Chromebook:
CtrlShiftOverview: The screenshot crosshair cursor will pop up, so you can select just what is needed. Move the resulting .png file to your module folder.
Submit Program 5
Place the p5-username-screenshot.png into the same folder as your p5-username-temperatures.py file and .zip them together. Upload the .zip archive to the Module > Assignment in Canvas. The Instructor/TA will download the zip archive and run your .py file to score it.
- Mac
Select the file(s) and right-click to choose Compress files. - Windows
Select the file(s) and right-click to choose Send to... → Compress (Zipped) archive. - Chromebook
Select the file(s) and right-click to choose Zip selection.