Introduction
In this module, you'll explore Semantic Hypertext Markup Language (HTML) web page creation and simple ways to style the page with Cascading Style Sheets (CSS).
In class, you'll work in small groups to practice applying HTML and CSS to your existing Periodic Table of Elements file.
Then, you'll filter, sort, convert, plot, output, and style a a new version of the Period Table of Elements in a web page.
Read about HTML
Hypertext Markup Language (HTML) is a set of elements/tags applied to text and images in plain text files which tell browsers how to display text, position graphics and form items, and display links to other pages. HTML can be used in conjunction with other languages such as Cascading Style Sheets, JavaScript, PHP, ASP, Ruby, etc. to provide unlimited functionality and interactivity.
- Semantic language to improve accessibility (for humans and machines)
- Improved media embedding
- Simpler interactive form functions
- Consistent page layout
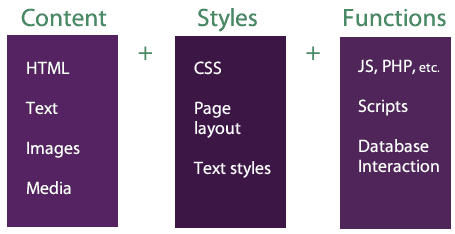
Typically, content is kept separate from styles and functions so that updating and upgrading can be seamless. Styles are controlled by Cascading Style Sheets (CSS) and Functions are controlled with JavaScript, AJAX, PHP, and other scripting languages.
This section of the module covers the following topics, which are the most basic HTML elements needed for this course. You can see from W3 School's HTML Reference, that there are many more!
Use this internal navigation list to jump to those topics lower on the page:
Page Layout elements

Just as with a printed newspaper or magazine, web pages have distinct areas that each serve a different purpose. For example:
- <header> is the banner/masthead which contains the logo, name, and slogan.
- <nav> is the table of contents for the website.
- <main> holds topic sections, such as News, Business, Sports, Weather, etc.
- <section> is used to label those related topic articles.
- <article> is assigned to each article, and each includes a heading, byline/citation, text, and sometimes images, tables, and interactive components.
- <footer> is at the bottom, typically, and includes a copyright statement, legal statements, and navigation to legal pages.
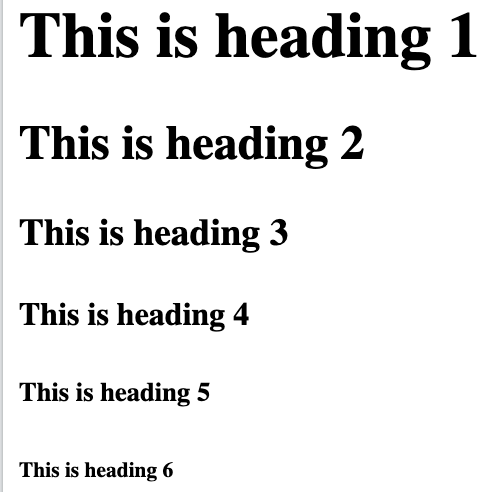
Headlines h1 to h6
Text within a headline tag is represented as a headline (or heading; not to be confused with <head> or <header>. The default style of a headline tag includes a bolder, larger font. They are used heirarchically in sections and articles of web pages to announce new or subsequent content. <h1> is used first, as highest level heading. Headngs run from <h1> through <h6> with <h6> being the lowest level heading that you might find deep in an article. In the document you are reading right now the title at the top of the page is an <h1> and the heading at the top of this section is an <h2>. If there are subsections they are <h3> headings. Headings are block-level elements.
If an <h1> headline is used at the top of the document, such as in a <section> element, then its <article>s will typically have <h2> level headlines with sub-topic headings <h3> and lower nested below it, as per the diagram at the right.
If you would potentially find something listed in the table of contents, it is a great candidate for a heading. Headings should be used to add organization to a document. So any section or sub section that needs a title can use a heading for it. Some elements are designed with their own headlines, such as <figcaption> for figures/images and <caption> for tables, and <legend> in forms.
To ensure our web pages are accessible to screen readers (for the visually impaired) and search engine algorithms, headlines <h1> to <h6> must be used hirarchically, rather than to add style to other elements. Even though they bold and perhaps larger, doesn't mean we can use them to add emphasis in a paragraph, for example.
Anchors / Hyperlinks
Navigating from one page to another, or within a document is the cornerstone of the 'web'. Adding an <a>nchor element from a piece of text to another area of a page or file creates a hyperlink. The content between the opening and closing <a> tags should describe the link when someone clicks to navigate to it. The href="" attribute is used to specify the URL where the link will take the user when it is clicked.
An external anchor element links to a URL,
When someone clicks on the anchored text, they are transported to that URL/page:
<a href="https://eecs.oregonstate.edu/data-science-and-engineering">Data Science and Engineering</a>
An internal anchor element links to a specific location
within a document using an id="" attribute, like this:
<a href="#node-5352">Overview</a>
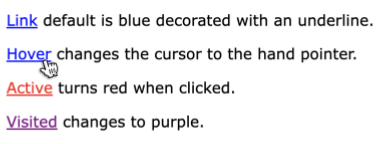
Anchors change color and cursor when active, hovering, or clicking and by default, look like this:
Lists and Paragraph
Paragraphs are sets of sentences that relate to one another. In HTML, the <p> element is wrapped around a set of sentences to mark them as a paragraph. Any text in a web page that is not marked with a <p> should be marked with some other related element; as no text in a page should be without an element.
Lists come in three flavors: ordered, unordered, and definition list.
<ul> for unordered lists
An unordered list is created using the tag ul. It can have one or more line items <li> nested between its opening and closing tags and can only have <li>s as children, like this:
  <ul>
    <li>first item</li>
    <li>second item</li>
    <li>third item</li>
  </ul>
The above markup for the unordered list displays like this:
- first item
- second item
- third item
<ol> for ordered lists
Ordered lists are automatically numbered or otherwise sequenced, unlike unordered lists. For this, we use the tag ol instead of ul. Here is the same list, now ordered, i.e., with ol instead of ul:
- first item
- second item
- third item
<dl> for definition lists
Definition lists, using tag <dl>, are similar but have pairs of terms <dt> and definitions/descriptions <dd> and are nested like this:
  <dl>
    <dt>MDN</dt>
    <dd>Developer guides for all things web.</dd>
    <dt>CSS Tricks</dt>
    <dd>Frontend web developer guides.</dd>
    <dt>World Wide Web Consortium</dt>
    <dd>Documents web specifications.</dd>
    <dd>Coordinates interoperability standards.</dd>
    <dd>Advocates for accessibility, internationalization, web security, and privacy.</dd>
  </dl>
This is rendered as:
- MDN
- Developer guides for all things web.
- CSS Tricks
- Frontend web developer guides.
- World Wide Web Consortium
- Documents web specifications.
- Coordinates interoperability standards.
- Advocates for accessibility, internationalization, web security, and privacy.
Tables
One of the most complex sets of nested elements is the <table> element.
Here is an simple table with caption, rows, column headings, and rows:
  <table>
    <caption>Elements of the Periodic Table</caption>
    <thead>
      <tr>
        <th>Element</th>
        <th>Phase</th>
        <th>Melt Temperature</th>
      </tr>
    </thead>
    <tbody>
      <tr>
        <td>Oxygen</td>
        <td>gas</td>
        <td>__</td>
      </tr>
      <tr>
        <td>Hydrogen</td>
        <td>gas</td>
        <td>__</td>
      </tr>
    </tbody>
  </table>
And here is what that table looks like when it is rendered in your browser:
| Element | Phase | Melt Temperature |
|---|---|---|
| Oxygen | gas | __ |
| Hydrogen | gas | __ |
- <table>
- This parent tag opens and closes the table. Its child tags will be nested between its opening and closing tags.
- <caption>
- This element represents the title and/or description of the data in the table, such as its purpose or result. It can be placed above the thead or below the tfoot.
- <thead>
- This is the table header, which nests the labels/headings for each column and/or row using <th> nested within a row(s) <tr>.
- <tbody>
- The table's body contains rows and columns of data and typically use the row <tr> with data <td> elements.
- <tr>
- Denotes a row in the table. It contains either data <td> elements or header <th> elements. A row must have either a data or header element to complete a "cell" in the table.
- <td>
- Denotes a data cell in a column of data in the table. It can include the column span colspan attribute (or row span rowspan if a cell must span more than one column or row. The number of spanned columns plus the number of normal columns must be equal to the number of <th> or <th> columns specified in the <thead> at the top of the table. Read more about colspan and rowspan.
- <th>
- Denotes a label/heading cell in a column of data in the table. It gets nested within a row(s) of the <thead>.
- <tfoot>
- This is the table footer, which is placed below the <tbody>. It includes one or more row with data cells. It is a great location for the results of calculations below columns.
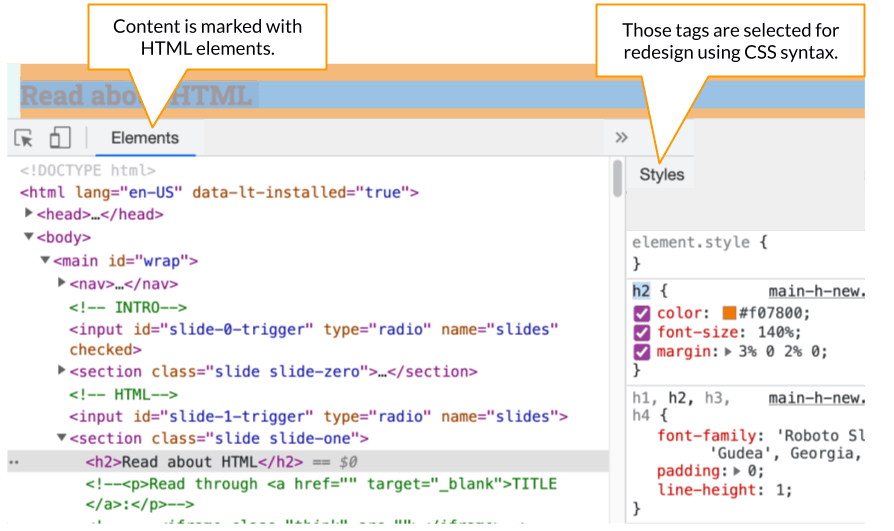
Move to the next tab to see how those default HTML styles can be revised by selecting their names and applying properties and values.
Read about CSS
A Cascading Style Sheet (CSS) allows us to modify the HTML styles that many of its elements have applied by default.
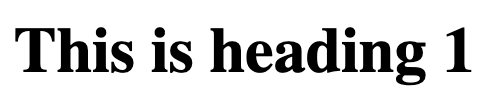
For example, the <h1> tag is set to display with these properties and values:
h1 {
  display: block;
  font-size: 2em;
  margin-top: 0.67em;
  margin-bottom: 0.67em;
  font-weight: bold;
}
...which looks like this:
We would not want all web pages too look the same! To enhance the user experience of reading and interacting with web pages, designers select the HTML elements and apply new colors, fonts, sizes, arrangements, and interactions. In this section of the module, you'll learn methods to select and redesign those basic elements that you learned about in the previous tab.
Use this internal navigation list to jump to those topics lower on the page:
Body is the Browser Viewport
The portion of a browser window that holds a webpage's content is called the viewport. Its default style has a white background with black text in Times font. It is boring and ugly! So, developers restyle it using new fonts colors, margins, and borders:
body {
    background-color:__;
    border:__ __ __;
    color:__;
    font-family:__;
    margin:__%;
    padding:__%;
}
The underlines in the stylesheet get replaed with color, width, and font values.
Box Model
The following interactive model demonstrates the properties that nearly all HTML elements have to create dimension and layering. Think of each element as a 'block' or 'box' that can be changed to reflect new or different properties, such as:
- outline
- margin
- border
- padding
- content
- line-height
- background
Hover over the words in the model below to learn their meanings and where they are placed within the block of an element:
Page Layout
CSS documents convert the HTML elements into selectors of the same name (but with different syntax), so we can list properties and new values to make them look and act differently. For example:
- header {} typically has background-color, padding, and border to differentiate it from the <main> area, like this:
header { background-color:orange; padding:15px; border:3px solid black; } - <nav> takes on many forms and is often seen in horizontal format at the top of a page
as well as vertically on the side of a page.
When combined with <a> elements, each has a default text-decoration (underline) and blue, purple, and red coloring
depending on the state of the mouse (hovering, clicking, or visited). Those defaults can be changed to improve usability, like this:
nav { text-align:center; } nav a { /* includes link, visited, active */ background-color:black; border:2px solid black; border-radius:5px 5px 0 0; color:white; font-size:1.1em; font-weight:bold; margin-right:3px; padding: 5px; text-decoration:none; } nav a:hover { background-color:white; color:black; } - <main> holds topic sections, such as News, Business, Sports, Weather, etc.
- <section> is used to label those related topic articles.
- <article> is assigned to each article, and each includes a heading, byline/citation, text, and sometimes images, tables, and interactive components.
- <footer> is at the bottom, typically, and includes a copyright statement, legal statements, and navigation to legal pages.
Headlines
The six heading levels of HTML look plain, but they can be restyled with color, font-size, background-color, margin, and padding, as well as borders.
To set the headings in a font different from the body and paragraphs,
the font-family property with a value different from Times New Roman can be applied, like this:
h1, h2, h3, h4, h5, h6 {
        font-family:'Gill Sans', sans-serif;
    }
To add a border, the three required values of the border property (size, type, and color) can be applied, like this:
h2 {
border:2px solid orange;
}
Tables
By default, tables have double-borders around each cell (which is made up of a
row <tr> and column <td> or <td>).
The double border can cause eye fatigue, so it is best to collapse it, using this property:value:
table {
    border-collapse:collapse;
}
To reduce eye fatigue even further, reducing the contrast between the border and text color for each row and column is helpful,
using the border property and three values, like this:
tr td, tr th {
    border:1px solid gray;
}
Depending on the other colors of the website/webpage, gray can be substituted.
When a table has a great deal of data, it is helpful to add padding inside each cell, like this:
th, td {
  padding: 15px;
}
When a column of numbers is displayed (for example, the last column in a receipt),
they should be aligned to the right (in English number systems). This can be accomplished like this:
td:nth-child(last) {
    text-align:right;
}
A table's caption, which is helpful to describe the data, can be added to the top or bottom of the table.
Its block model is styled separately from the table. By default it is at the top, but if it reads better to have it below, then use:
caption {
    caption-side: bottom;
}
The width of a table is dependent on its data. For example, if a table has a column with a lot of text or long numbers, then cell will
expand to allow it. If a table is small and has few data, then won't spread across the entire page.
If, however, the layout of the table works best at a specific width,
then the width property is applied, with a percentage or other value, like this:
table {
    width:80%;
}
When a table has a lot of columns and rows, then it is helpful to add
zebra-striping to every other row, which an be accomplished like this:
tr:nth-child(odd) {
    background-color:whitesmoke;
}
Start Program 8
Program 8 will span 2 weeks and includes content learned in Module 7, 8, 9, and 10.
- Copy your existing p7-username-pte folder from the previous chapter and place it in your existing Module 9 workspace folder.
- Rename the folder p8-username-web.
- Confirm that the data folder still includes the periodic-table.json file.
- Open the folder in VS Code.
- Rename the elements.py file to elements2.py, to ensure you don't confuse it with the previous chapter's work.
- Edit
elements2.py file in VS Code by adding the matplotlib module:- Comment with your first and last name, the date, the name of this assignment "Period Table of Elements website", and a paragraph that describes the data, libraries, methods, and output of the program.
- Add the import matplotlib.pyplot as plt statement, so you can output a chart of the melting points.
- Under the existing statement that converts all of the elements to a Panda DataFrame,
add the following to show only these columns from the dictionary:
- Number
- Name
- Phase
- Melting Point.
elementsColumns = elementsAll.loc[:, ['number', 'name', 'phase', 'melt']] - Then, instead of printing a table of all elements or the results of the melt calculation, convert just those four columns to HTML.
- Print the new table to confirm the results.
- Open and write to a new file called elements2.html and close the data file.
- Prepare to plot the element numbers and their melting points to a figure using matplotlib syntax:
elementsColumns.plot.area(stacked=False); - Include these functions to label the figure:
plt.suptitle() # your first and last name plt.title() # Title of the plot plt.xlabel() # Atomic element number plt.ylabel() # Melting point in Kelvin - Save the resulting figure as a .png file set to 144 dots per inch, like this:
plt.savefig('melting-points.png', dpi=144) - Plot the columns using:
plt.show()View the resulting figure window and refresh the file list in VS Code to see the new .png file and the new elements2.html file. - Make changes to the program, as needed, and rerun the program to get the required output.
- Don't run it once you start the next step; your program will overwrite the elements2.html file. What can you change in your program to keep it from accidentally overwriting your program?
- View the new elements2.html file in the browser
to see how it looks so far.
- Edit elements2.html file in VS Code. Use this keystroke to add necessary HTML tags to the top of the file, above the table tag: ⌘i (Mac) or cntli. Move the ending tags for </body> and </html> to the bottom of the file, so that your elements table is between <body> tags.
- Update the <title> tag to show your first and last name as well as Periodic Table of Elements.
- Using the knowledge provided in the HTML tab of this module,
add these tags to the top of the <body> area, before the <table> tag:
- <header>, to hold the heading 1 and your name.
- <h1>, to title the web page.
- <p>, to provide your name.
- <main>, to differentiate the content from the header area.
- <p>, to describe the new web page by mentioning the technologies used to produce it.
- Just under the beginning <table> tag, add a <caption> tag with text that briefly describes the data.
- Under the ending </table> tag, add a <footer> with <p> tag
to add a copyright statement, like this:
© 2022 Pam Van LondenTo create the copyright symbol, use ©
- Create a new file called main.css (to correlate with the file referenced in the link tag in the head area.
- Using the knowledge provided in the CSS tab of this module,
add these selectors (which match up with the HTML tags),
so they use a new font and colors.
- body {}
- header {}
- h1 {}
- main {}
- p {}
- table {}
- caption {}
- tr th {}
- tr td {}
- footer {}
- In the body {} selectors, define the background-color, border, color, font-family, margin, and padding values.
- In the table {} selectors, define the border-collapse and border values.
- In the main {} and footer {} selectors, define the background-color and padding.
- Defining more styles for those three selectors, or any other selectors is optional.
- View the new elements2.html file in the browser.
- Correct syntax errors in both files to ensure each tag and style renders as intended.
- Backup your work to a cloud drive and/or USB stick drive.