Introduction

In this module you'll explore built-in Python Modules, such as math and random, to create a sine wave on a Turtle Canvas.
Then, you'll create your own module for a shop that sells drinks, so that you can take customer orders.
In-class Activities
Update your Python Concept Reference Sheet
In your existing small group, collaborate in your existing Google Sheets or Excel file to describe the new Modules presented in chapter 5. Continue to add to the list as you progress through the chapters.
Plot a Sine Wave
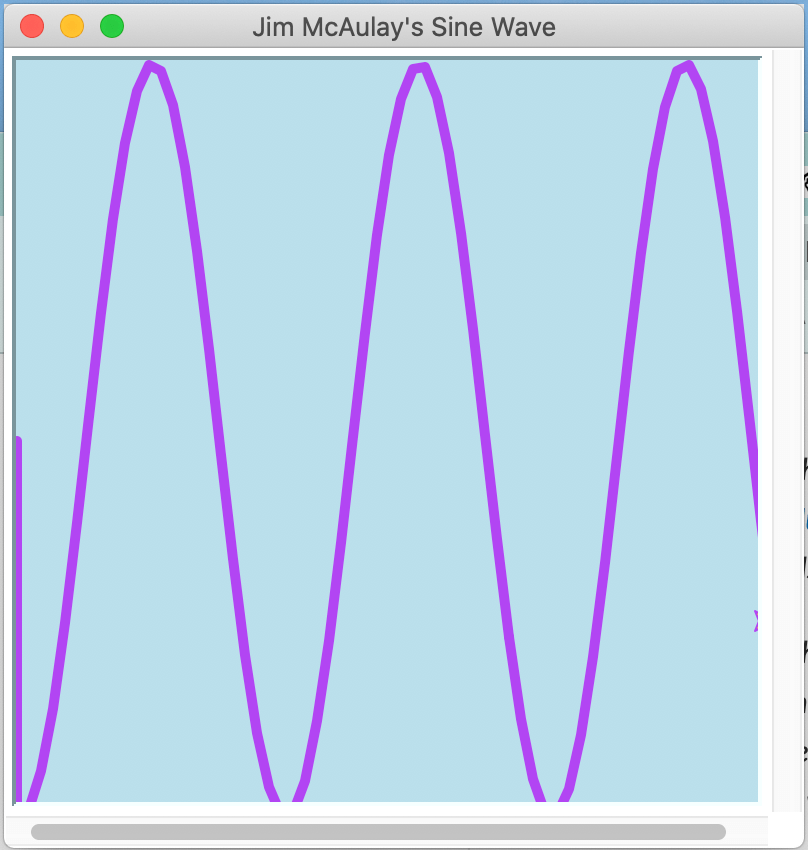
Work together in small groups to complete the Plotting a Sine Wave Lab related to chapter 5.
Vocabulary
- Amplitude
- The measure of a wave's change in a single period...the height?
- Frequency
- How quickly an object changes...the width?
Write Program 4
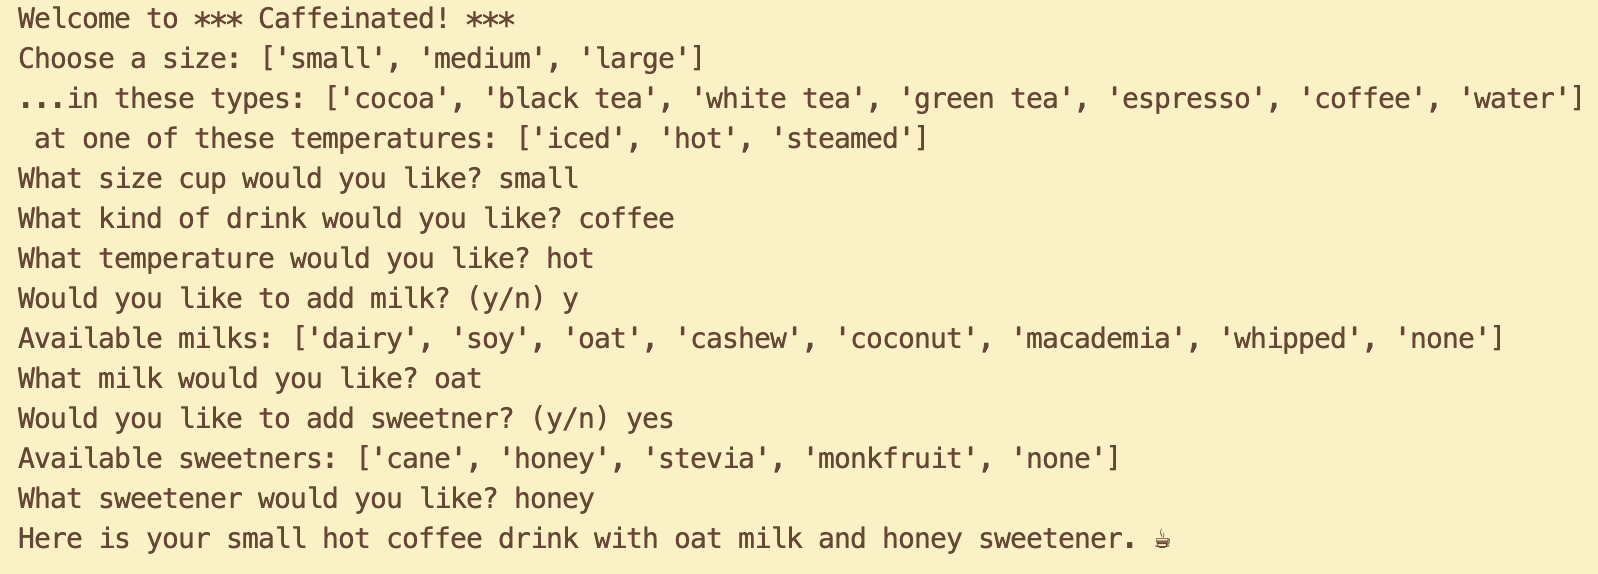
This program relies on knowledge from Chapters 2 and 5, and is related to 5.5 Creating Modules
- In the fifth module folder of your workspace folder, make a new Folder named p4-username-drinks. Replace 'username' with your ONID username.
- Inside that folder, make a new file called shop.py, then
write commands in Python to do the following:

- Comment your first and last name and the date.
- Comment the name of this assignment "Drinks".
- Comment a paragraph that describes the purpose of your program.
- Include the following:
- Write pseudocode comments that describe each step of the module.
- A module file for the Drink Shop that defines variables for:
- The name of your drink shop.
- A list of sizes for your drinks.
- A list of drink types.
- A list of drink temperatures.
- One or more list of additions, such as milks, sweeteners, flavors, toppings, etc.
- One or more emoji related to the shop or drink order. Find emojis at Emoji Copy
- Returning the entire drink order in a complete sentence using """, def, return, {}, and .format().
- Variables must pass through a function to be returned in the print statement(s).
- Other messages of your choice.
- Make a new file called customer.py
- Includes pseudocode comments which describe each step of the program.
- Imports the module file.
- Prints new lines with special characters to improve readability of the order in the console/terminal.
- Prints messages to invite a customer to order specific sizes, types, temperatures, and additions for their drink.
- Takes size, type, temperature, and additions input from the customer.
- Converts that input to a new variable with lowercase characters.
- Uses at least one if statement.
- Sends the order to the module file.
- Prints the full order in a complete sentence with proper grammar and punctuation.
- Prints the emoji in a logical location.
- Save the file using cntls or ⌘s.
- Run the program using one of these methods:
- Click the run arrow ▶ at the top right of the editing screen.
- In the terminal, type: python p1-username-datatypes.py
- Right-click on the file in the file list (or from in the file) and choose Run Python file in terminal.
- Take a cropped screenshot of the final output of your program.
- Windows:
 Start → All Programs → Accessories → Snipping Tool
New → Rectangular Snip to select just the portion of the window and screen you need to show.
Or, newer Windows computer systems may use the Snip and Sketch tool's WindowsShifts keystroke.
Save the file as .png and move it to your module folder.
Start → All Programs → Accessories → Snipping Tool
New → Rectangular Snip to select just the portion of the window and screen you need to show.
Or, newer Windows computer systems may use the Snip and Sketch tool's WindowsShifts keystroke.
Save the file as .png and move it to your module folder.
- MacOS:
⌘Shift4 to draw a marquee around just the canvas/window of your app. Or use the Preview application to capture, edit, and save the file. Applications → Preview → File → Take Screenshot → From Selection.
Drag the crosshair cursor over the area you want to capture.
The image saves in .png format.
Edit as needed.
Or, you can use the searchsearch bar on the top right of the Finder to search "screenshot."
The screenshot crosshair cursor will pop up automatically.
Select the area you want to capture and it will save a file to the Desktop.
Move the resulting .png file to your module folder.
Applications → Preview → File → Take Screenshot → From Selection.
Drag the crosshair cursor over the area you want to capture.
The image saves in .png format.
Edit as needed.
Or, you can use the searchsearch bar on the top right of the Finder to search "screenshot."
The screenshot crosshair cursor will pop up automatically.
Select the area you want to capture and it will save a file to the Desktop.
Move the resulting .png file to your module folder.
- Chromebook:
CtrlShiftOverview: The screenshot crosshair cursor will pop up, so you can select just what is needed. Move the resulting .png file to your module folder.
- Windows:
- Backup your work to a cloud drive and/or USB stick drive.
Limitations
- Do not copy any existing variables, lists, strings, or def functions.
- Add a space or new lines \n at the end of an input prompt to ensure the input string does not touch the prompt. For example: "prompt?response" should be "prompt? response".
- All variables defined in the shop must pass through the function(s).
- The entire order must be provided in a single print statement via a function, using correct grammar and spacing.
Submit Program 4

Select the p4-username-drinks folder (that holds your username-screenshot.png file and the customer.py file and the shop.py file, then zip the folder. Upload the .zip file to the Module > Assignment in Canvas. The Instructor/TA will download the zip archive and run your .py file to score it.
- Mac
Select the file(s) and right-click to choose Compress files. - Windows
Select the file(s) and right-click to choose Send to... → Compress (Zipped) archive. - Chromebook
Select the file(s) and right-click to choose Zip selection.