Introduction
In this module, you'll explore various ways to make complex lists called dictionaries. You'll read about how they are created, retrieved, updated, and deleted (CRUD). You'll experiment with sorting, opening an external JSON dataset, converting a JSON file to Panda DataFrames, and export it to an HTML web page.
In class, you'll work in small groups to update your Python Concept Reference Sheet and perform CRUD actions on a small dictionary file.
Then, you'll create an HTML page with a table of the Period Table of Elements retrieved from an external JSON file.
Manipulate Dictionaries
Sorting Dictionaries
Read the following sources about sorting different forms of Python lists and dictionaries:
- Python Dictionary, Programiz, article/video.
- Sort Dictionary by key in Python, Python Pool.
- Sort Dictionary By Key Or Value In Python, Script Everything
Opening JSON files
We've experimented with comma-separated values (CSV) files, but another common file format is JavaScript Object Notation (JSON), which is a common data exchange format used with many programming languages.
JSON files can be read into python files from local .json files or from an online file hosted by a service that provides random data for testing for visualization and manipulation. Some files you can find online include types of beer, random user data, the periodic table of elements, Nobel Prize winners, Black History Month facts, space and atmosphere details, the International Space Station (ISS) current position, and many other datasets.
Read more about the options:
- Reading JSON from a file, Python Basics
- SSL Certificate verification..., Geeks for Geeks
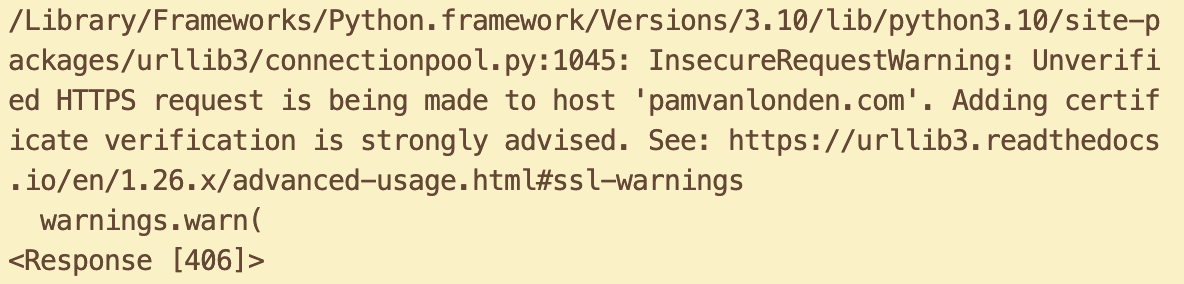
Notice that without the SSL certificate URL and its key URL, it sometimes impossible to use an online dataset file. We will instead save a common dataset file to our hard drive and work with it locally.
Exporting to HTML using Pandas
HyperText Markup Language (HTML) is the common format used to render web pages. Typically, web page content is marked with HTML tags, which are styled with Cascading Style Sheets (CSS), then additional layers of interactivity and animation are added on top of that. To give large datasets a cleaner look and to make them more useful to a larger audience, we can export them to HTML tables.
Read more about the options: How to render Pandas DataFrame as HTML Table?, Geeks for Geeks, 2022.
- Install the Panda module from the terminal. Type the following:
pip install pandas
OR
pip3 install pandasThis should work without problems as long as you have the pip module installed. If you have trouble add Python and Pip extensions to VS Code (see previous modules). If you are using Windows and continue to have issues installing Panda, then refer to the Inclass Activity tab in Module 7. - In a .py file, import the module:
import pandas as pd(Even if the 'pandas' word is underlined by VS Code, it will probably work.) - Use this option to format a dictionary file as HTML:
pd.DataFrame(data['file'])
In-class Activities
Update your Python Concept Reference Sheet
In your existing small group, collaborate in your existing Google Sheets or Excel file to describe the new dictionary and sorting terms presented in chapter 12 and the sorting readings. Continue to add to the list as you progress through the chapters.
Experiment with Dictionaries

Work together to create, read, update, sort, and delete a dictionary in various ways. Refer to Ch 12 and additional readings.
Follow these specifications:
The output should look like this:

- Add a new file to your workspace folder called dictionary-crud.py.
- In the new file, create an empty dictionary of any topic of your choice.
- Add at least 10 key:value pairs to the dictionary using a variety of methods.
- Copy the dictionary so you can play without harming the original dictionary, using:
dict2 = dict1.copy() - Retrieve the entire dictionary to ensure the copy worked:
print(dict2) - Retrieve the value of one key using the get() method, and print it:
dict2.get(1) - Retrieve each key in the dictionary using the keys() method, and print it:
dict2.keys() - Retrieve each value in the dictionary using the values() method, and print it:
dict2.values() - Update (insert) two new items into the dictionary using the update() method, and print it:
dict2.update({keyName: "ValueData"}
If that didn't work, check for membership first, then update, like this:if 11 not in dict2: dict2[11] = "ValueData11" if 12 not in dict2: dict2[12] = "ValueData12"If your dictionary uses strings for the key, then use quotemarks in the if statement. - Delete one of the items from the dictionary using the
pop() method (which will also display it), and print it:
dict2.pop(4) - Clear the dictionary using the clear() method, then print it:
dict2.clear()Dictionary 1 is still intact; print both to prove it. - Create another dictionary with two characteristics for each item,
define a function to choose a sort key, sort by that key, then print the results
using Pandas DataFrame formatting:
import pandas as pd
dict3 = [
    {'name': "thing1", 'stars':5},
    {'name': "thing2", 'stars':2},
    {'name': "thing3", 'stars':6},
    {'name': "thing4", 'stars':4}
]

def getStars(each):
    return each["stars"]

dict3.sort(key=getStars, reverse=True)

dict3Sorted = pd.DataFrame(dict3)

print(dict3Sorted)
Refer to the Manipulating Dictionaries tab for details about installing Pandas.
See Canvas for details about extra credit for this activity.
Write Program 7
Program 7 will require skills learned in Module 8.
- In the eighth module folder of your workspace folder, make a new folder called p7-username-pte. Replace 'username' with your ONID username.
- In the new p7-username-pte folder, add a new folder called data.
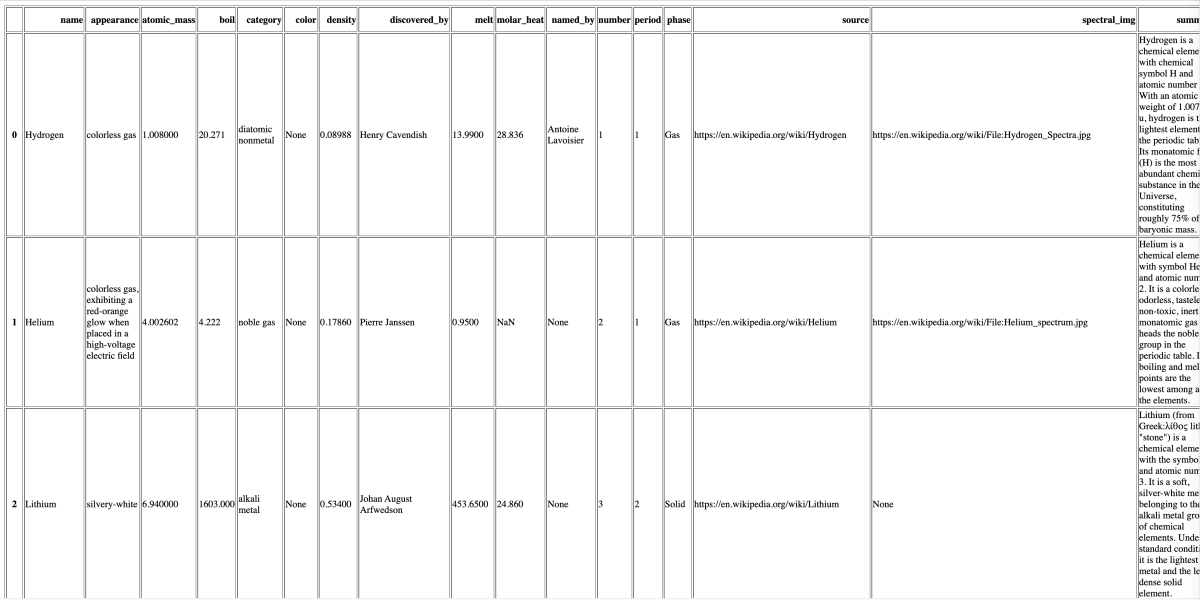
- Save the Data File: Right-click to Save as... this periodic-table.json .json file to your new p7-username-pte folder's data folder. The file is a dictionary of the Period Table of Elements provided by Bowserinator/HelloMouse on GitHub. It contains 118 elements, each with 27 key/value pairs.
- In the new p7-username-pte folder, add a new file called elements.py. Be sure it is not saved in the /data/ folder.
- Write commands in the .py file to do the following:
- Comment with your first and last name, the date, the name of this assignment "Period Table of Elements", and a paragraph that describes the data, libraries, methods, and output of the program.
- Import libraries: json and pandas as pd library files. Refer to the Maniplate Dictionaries tab of this chapter to install the Pandas module.
- Open the JSON file:
Use a with statement to open the file (from the current location on your hard drive) as a name:
with open('data/periodic-table.json') as file:
    data = json.load(file)
OR, if the file did not download in the Universal Type Format 8-bit (UTF-8), you may need to encode the file with the Multi-Byte Character Set (MBCS)
with open('data/periodic-table.json', encoding="mbcs" )... - Load the file:
Use that name with json.load() to create a new variable that represents its data:
elements = pd.DataFrame(data['elements']) - Convert using Panda: convert the data's "elements" dictionary to a DataFrame.
Print that data of elements to confirm it works:
print(pd.DataFrame(elements))Run the program...do you notice that it is truncated and difficult to read? - Convert to HTML:
use the to_html() function to convert the elements to an HTML table.
Add the (index=False) option to remove the default list index;
this dictionary should rely on the Element Number instead.
Print that table in the console to see how it looks.
eTable = elementsAll.to_html(index=False) print(eTable) - Run the program...do you notice the HTML tags that surround each key/value pair?
- Reduce the table so it prints only the elements that
melt between 1 and 100 degrees Kelvin (no need to convert to Fahrenheit)
and removes the index column. First define the calculation:
elementsMelt = elementsAll[(elementsAll['melt'] > 1) & (elementsAll['melt'] < 100)]
Then, redefine eTable to convert elementsMelt to HTML.
Then, print that data in the console in DataFrame format and as HTML to confirm the calculation worked. Which previous statements can you copy and edit to accomplish this? - Write the reduced data to a web page:
Open an HTML file with the filename: "elements.html"
in "w" mode (which means the file is 'writable'):
eFile = open("elements.html", "w")
Write that resulting reduced HTML table to that file:eFile.write(eTable)
Close the file:eFile.close()
- View the results: To view your new HTML file, drag it from VS Code or your hard drive's workspace folder to a browser window/tab. Voila! You've made a web page. Notice that the page displays just the table of elements. It is devoid of the conventional web page elements, such as headings, menus, images, etc. We'll learn more about that in the next module.
- Take a cropped screenshot of the HTML table. Just capture a few of the rows/columns,
like the screenshot example at the top.
- Windows:
 Start → All Programs → Accessories → Snipping Tool
New → Rectangular Snip to select just the portion of the window and screen you need to show.
Or, newer Windows computer systems may use the Snip and Sketch tool's WindowsShifts keystroke.
Save the file as .png and move it to your module folder.
Start → All Programs → Accessories → Snipping Tool
New → Rectangular Snip to select just the portion of the window and screen you need to show.
Or, newer Windows computer systems may use the Snip and Sketch tool's WindowsShifts keystroke.
Save the file as .png and move it to your module folder.
- MacOS:
⌘Shift4 to draw a marquee around just the canvas/window of your app. Or use the Preview application to capture, edit, and save the file. Applications → Preview → File → Take Screenshot → From Selection.
Drag the crosshair cursor over the area you want to capture.
The image saves in .png format.
Edit as needed.
Applications → Preview → File → Take Screenshot → From Selection.
Drag the crosshair cursor over the area you want to capture.
The image saves in .png format.
Edit as needed.
Or, you can use the searchsearch bar on the top right of the Finder to search "screenshot." The screenshot crosshair cursor will pop up automatically. Select the area you want to capture and it will save a file to the Desktop. Move the resulting .png file to your module folder. - Chromebook:
CtrlShiftOverview: The screenshot crosshair cursor will pop up, so you can select just what is needed. Move the resulting .png file to your module folder.
- Windows:
- Backup your work to a cloud drive and/or USB stick drive.
Submit Program 7
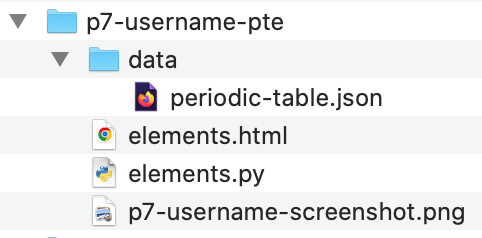
Zip the folder that contains a folder and four files: p7-username-screenshot.png, data/periodic-table.json data folder and file, p7-username-pte.py, and the resulting elements.html file. Upload the .zip file to the Module > Assignment in Canvas. The Instructor/TA will download the zip archive and run your .py files to score them.
- Mac
Select the file(s) and right-click to choose Compress files. - Windows
Select the file(s) and right-click to choose Send to... → Compress (Zipped) archive. - Chromebook
Select the file(s) and right-click to choose Zip selection.